Use Pinterest to Decide Which Posts to Update

Do you know how to tell which of your posts are being pinned? Besides looking at your blog stats at the end of the day. Do you want to know what people are saying about your posts when they pin them, if anything? Or if they are being repinned?

Well, I will show you how, but I don’t want you to waste a lot of time doing this. Use this occasionally as a tool to improve your posts and traffic.

How to find Which Posts are Being Pinned on Pinterest:

In the link below, replace my blog’s URL (it is in orange) with your blog’s URL

http://pinterest.com/source/premeditatedleftovers.com/

and then enter the link in your browser and hit enter and you will be taken to a list of your posts that have been pinned.

How to See which posts are being pinned

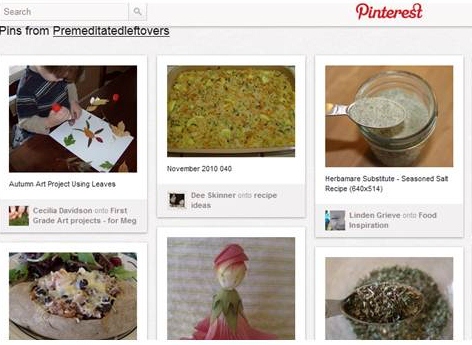
How is seeing which posts have been pinned helpful? Just from these few pins, I can see that my followers are already thinking ahead to fall. Now, would be a good time for me to start sharing fall posts, both old and new, across my social media accounts.

I can also tell that my followers are not writing blurbs, they are using the names of the pictures in my posts. Which is okay for the posts that have nicely named images using key words. But as you can see from the image in the center top row, I still have unnamed images on my blog. And since that casserole is a turkey rice bake, now would be a good time to update that post and name the image because turkey recipes are going to continue to trend over the next 2 months.

How to Update Old Posts:

Rename the Images in Your Old Posts – Seriously, this is huge; take the time to do it.

Include Internal Links to Related Posts this is the easiest way to increase your page views.

Look for Opportunities to Include Key Words and consider bolding key words. Reorganize the post to include  H1 or H2 headings to make your keywords standout and your post easier to follow for your readers.

Monetize Posts with Relevant Ads

Once you have updated your post, go and share it on all of your social media accounts!

Have you started updating your fall and winter posts yet?
Make Money Selling Your Photos Online

Tips for Selling Your Photos Online to iStockphoto

I am not a good photographer, but my oldest son is quite gifted. Unfortunately, he is busy majoring in anthropology and isn’t available to take pictures of my culinary creations. And he would rather eat my food than photograph it! I can’t benefit from his skill, but I thought that he could profit from it so I did a little research.

One of the most popular sites to buy and sell photos is iStockphoto. It also happens to be the source I turn to when I need a stock photo, like the one I used in my header. To sell photos at iStockphoto, you need to:

1. Be a member of iStockphoto.

2. Read a manual based on the type of photos you plan to submit and take a quiz.

3. Submit 3 examples of your work.

Sounds easy…if you know how to take a picture. If this is something you are interested in, Michelle at SomeGirl’s Website has written a series on How to Get Your Photos accepted at iStockphoto.

How to Get Accepted at iStockphoto Part 1

How to Get Accepted at iStockphoto Part 2

How to Get Accepted at iStockphoto Part 3

Many of Michelle’s tips are transferable to other online photography sites.  Here are an additional 18 options for places to sell your photos online.

How and When to Rename Images in Old Posts

Last week I told you how you can increase traffic by renaming your photos with key words. I know some of you are thinking “But I have over 100 posts with unnamed photos. How am I ever going to name them all?” Just thinking about it can be overwhelming. So instead of dealing with all those unnamed images, you decide to make the world a happier place by creating a recipe for German Chocolate Brownies.

I might know something about procrastination. Which is why I developed my own system for how and when to update image names. Some might call it lazy, and if you didn’t know better you might think it was a random and disorganized approach.  But I like to think of it as a deliberate and strategic plan for naming old images. That’s my story and I’m sticking with it.

My Strategy for Renaming Old Photos:

Don’t create any more old, unnamed images. Make a commitment to name all of the new images you upload so you do not create more work for yourself. It takes less time to do it correctly now, than it does to go back and fix it later.

Update images in posts as they become relevant. I did not start with my oldest post and systematically update each image. I rename images as they become timely and in season. There is no reason to update posts on Christmas in August. Instead update your images on recipes for seasonal produce, canning, making jam, drying herbs, picnic inspiration, etc. In other words rename the photos in posts that are on subjects people are searching for now.

Update images before they become relevant. People start searching on some recipes and topics a few weeks to a month ahead of time. I use Pinterest to help me gauge when people start searching on different topics. When I see a trend emerge, I search for posts I have on that topic and update the photo names.

Update Images as you link to old posts. When I link to an old post, I take the time to make sure the post I am linking to has named photos. I also check to see if the images have names before, I share an old post on Facebook. You can do a quick check, by running your mouse over your photo and see what name pops up in the box.

When short on time, just rename the first image or the best image. When time is short and I am faced with an old post with lots of pictures, I just rename 1 or 2 images instead of all of them. Hopefully your first image is your best image, if not, try to find the time to name them both.

This system means that there are still unnamed images on my blog, but I am not worried about it. If I feel those old posts become topical, I will update them.

How to Rename Old Images in Blogger Posts:

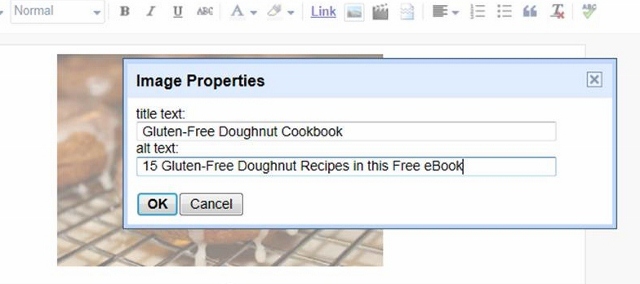
If you use Blogger, you can go back and add a title and alternate text to your image.

How to add a title and alternate text to images on blogger blogs

1. Open your old Blogger post in Edit mode.
2. Click on your picture and a tool bar will appear below your picture.
3. Click on Properties.
4. Then fill in the Title and Alternate Text fields.
5. Press OK to save changes.

Repeat for other images in the post.

How to Rename Old Images in WordPress Posts:

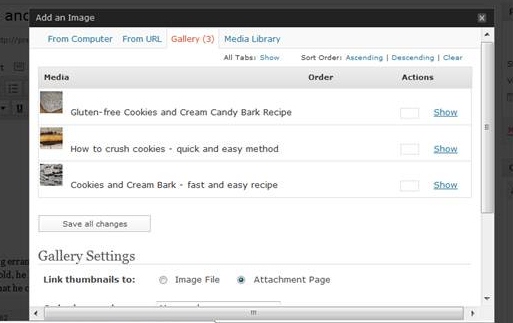
If you use WordPress, you can go in and add titles and alternate text to multiple images easily.

How to Add Title and Alt. Text to Unnamed Images in WordPress Posts

1. Click on Edit Post.
2. Click on Add Image.
3. Click on  Gallery. The Gallery will open with all of the images from that post.
4. Click on Show for the image you want to edit.

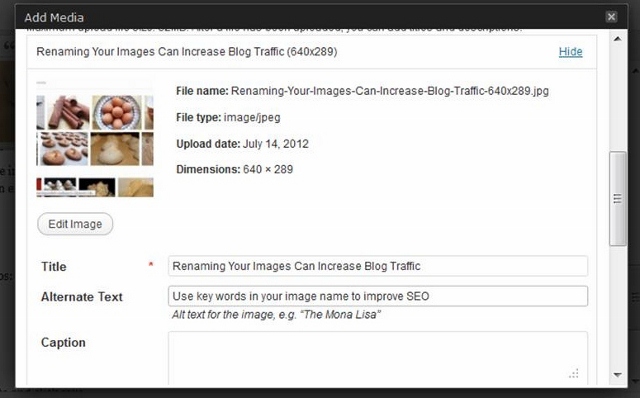
Add key words to the alternate text field to improve your SEO

5. Fill out the Title and Alternate Text fields.
6. Click Show on the next image you wish to update and repeat step 5.
7. Scroll down to below the last image and click the Save All Changes button (it is just above the Gallery Settings).

As I stated in my post on How to Increase Blog Traffic by Naming Your Images, you don’t want to overuse key words or stuff your images full of key words;  just use the title and alternate text fields to share what is truly relevant to those doing a Google Image Search.

Do you have a different strategy for renaming old photos? Let me know in the comments and/or come share it with us on Blogging for Foodies Facebook Page!

Related Posts:

Create Post Titles that will Increase Your Blog Traffic 
How to Increase Blog Traffic by Naming Your Images

Increase Traffic by Naming Your Images

You have created a delicious recipe. You made your hungry family wait while you  photographed it from every angle. You wrote a charming post with a traffic boosting title. You even spell checked your post. You’re ready to hit publish. Wait!

Did you name your photos?

If you are like most food bloggers, you have probably overlooked this simple step. And naming your images wisely has the potential to move your post to the head of the line in Google searches.

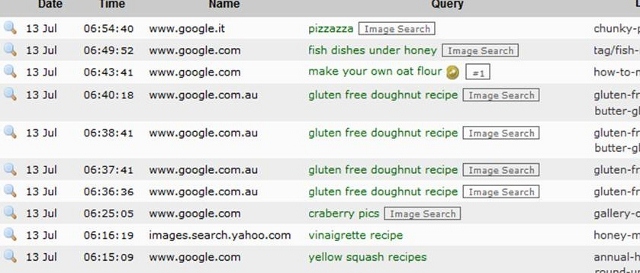
In the above image, you can see that some of my traffic is coming from Image Searches on Google. People don’t just want a recipe, they want to see what the final product of that recipe, and many people want to see it as early in the search process as possible so they use Google images.

Scroll over some of the pictures on your blog posts. When you scroll over the image a box will pop up with the image’s name in it. What does it say?

June2010(35).jpg is not a good name. Neither is PBCookDec15.jpg. and IMG_1828.jpg tells you nothing about the photo. Now edit the photo, what is written in the alternative text field? Is it blank? We need to fix that right away!

Take the Time to Rename your Image!

After you crop your picture in your photo editor, rename it with a name that uses key words from your post or recipe. When you hit save in Pixlr or PicMonkey, it gives you the option of changing the name of the photo. Use a keyword rich name now! You may find the “rename” option under properties in your photo editor. If you cannot find the rename option anywhere on your photo editor, simply click on “save as”, rename your photo, and then save it as a jpeg.

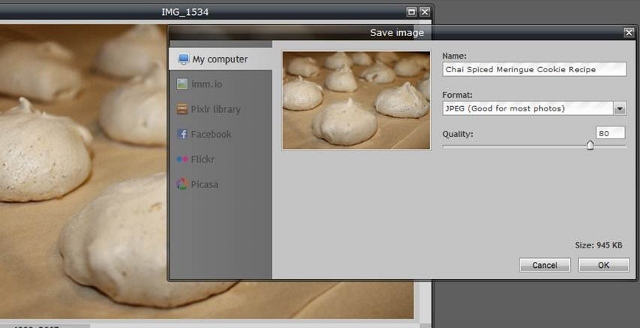
Using Pixlr, I changed the image’s name from IMG_1534 to Chai Spiced Meringue Cookie Recipe. You don’t need to overload your image name with key words, just put in enough to help a searcher find your recipe in an image search.

Use key words in the alternative text field on your images image to improve SEO

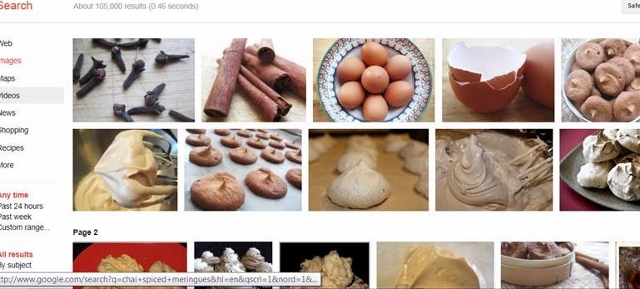
My cookie picture is not going to win any awards, but it is right there front and center in the image results from a Google search. Even though my picture is not that good, it is going to perform better than all of the gorgeous, unnamed pictures. So I really shouldn’t be sharing any of this information with you skilled photographers. 🙂

Google’s image results appear differently than Google’s other search results. You can easily scroll through many pages of image results, instead of having to click on a new page for every 10 results. So this means that even if your images are much further down in the search results they are more likely to be seen and will do better than if they were in the same position in Google’s Web results.

Don’t name all of the images in a post the same name with a number after it (peanut butter cookie (1), peanut butter cookie (2), etc.) Instead use the opportunity to share slightly different variation of the key words from your post to capture more searchers.

Add a Title and Alternate Text to Your Images:

If you use Blogger, you can also add more key words by adding a title and alternate text to your image.

How to add a title and alternate text to images on blogger blogs

Click on your picture while you are in edit mode. A tool bar will appear below your picture. Click on properties. Then fill in the title and alternate text fields. Press OK.

If you blog using WordPress, you have another chance to add key words to your image by filling out the Title and Alternate Text fields when you upload images to your blog.

Add key words to the alternate text field to improve your SEO

Make sure you fill out the  alternate text fields when you load images to your WordPress blog. Although Google doesn’t read the image title, some pinning apps pull it and use it as the title of the pin, so go ahead and fill it out. As I stated before, you don’t want to overuse key words or stuff your images full of key words;  just use those fields to share what is truly relevant to those doing a Google Image Search.

Related Posts:

Create Post Titles that will Increase Your Blog Traffic