How to Optimize a Coupon/Deal Post for SEO and Connect with Readers

Monetization Monday -
How can you optimize a coupon or deal post for Search Engine Optimization (SEO)? The same way you optimize any post for SEO:

Choose a good Post Title 

Name your Photos

Use Keywords

Make Use of Tags

Connect with your Readers! If you engage your readers and they interact with your post and share it, Google is going to take your post more seriously. And you will probably also make more money.

I accidentally discovered this when sharing a post on Pyrex. I just wanted to do my readers a favor and passed on a great deal I discovered. When I wrote the post I did all the things I would normally do for SEO out of habit and the result was that I ended up on the first page of SERPs for that Pyrex item and received quite a bit of search traffic, which I didn’t expect. I didn’t land on the first page of SERPs solely based on my actions, I ended up there because all of the websites who had more credibility than me on Pyrex failed to take those actions.

It is easy to connect with readers about Pyrex when you spend a lot of time writing about leftovers, but what about other types of coupons and deals?

Here are two coupon posts that I feel are a good example of optimizing for SEO while engaging reader from FoodNService:

Free Nyquil and DayQuil at Dollar Tree

Free Cepacol Sensations Cooling Throat Drops (he even includes an internal link to his previous post!)

First let’s talk about the fact that he let’s his voice come through in this post. It is not an automated “go here to get this coupon” post. It is better to write one engaging coupon/deal post a day than quickly push out 10 coupon posts a day. And unless you are a mega blogger,writing one engaging deal post a day is much more profitable than publishing 10 robotic coupon posts.

Now let’s talk about SEO. Why would you go to the bother of optimizing a coupon or deal post for SEO when the offer will expire in a week or two? If you have edited your blog URL so that the date is not included in the post’s URL (How to Customize your URL in WordPress and How to Change Title Format in Blogger) then you can update the post that has already been optimized for SEO with relevant information and links as they become available, and republish the post just by changing the publish date in your dashboard. When you republish that post, it already has a huge SEO advantage all the other similar articles that are posted on the web.

And yes, it is perfectly acceptable to republish posts that have been updated with relevant information!
Use Pinterest to Decide Which Posts to Update

Do you know how to tell which of your posts are being pinned? Besides looking at your blog stats at the end of the day. Do you want to know what people are saying about your posts when they pin them, if anything? Or if they are being repinned?

Well, I will show you how, but I don’t want you to waste a lot of time doing this. Use this occasionally as a tool to improve your posts and traffic.

How to find Which Posts are Being Pinned on Pinterest:

In the link below, replace my blog’s URL (it is in orange) with your blog’s URL

http://pinterest.com/source/premeditatedleftovers.com/

and then enter the link in your browser and hit enter and you will be taken to a list of your posts that have been pinned.

How to See which posts are being pinned

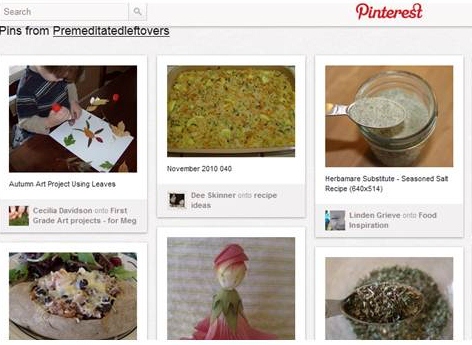
How is seeing which posts have been pinned helpful? Just from these few pins, I can see that my followers are already thinking ahead to fall. Now, would be a good time for me to start sharing fall posts, both old and new, across my social media accounts.

I can also tell that my followers are not writing blurbs, they are using the names of the pictures in my posts. Which is okay for the posts that have nicely named images using key words. But as you can see from the image in the center top row, I still have unnamed images on my blog. And since that casserole is a turkey rice bake, now would be a good time to update that post and name the image because turkey recipes are going to continue to trend over the next 2 months.

How to Update Old Posts:

Rename the Images in Your Old Posts – Seriously, this is huge; take the time to do it.

Include Internal Links to Related Posts this is the easiest way to increase your page views.

Look for Opportunities to Include Key Words and consider bolding key words. Reorganize the post to include  H1 or H2 headings to make your keywords standout and your post easier to follow for your readers.

Monetize Posts with Relevant Ads

Once you have updated your post, go and share it on all of your social media accounts!

Have you started updating your fall and winter posts yet?

Free eBook: Ultimate SEO 2012 Report

I just downloaded SEO Ultimate 2012 Report: Search Engine Optimization for Today’s Internet & Google for FREE on to my Kindle. I have only just started reading it, but so far it is written in an accessible manner and is very thorough.

I don’t know how long the SEO Ultimate 2012 Report  it will remain at this price, so check the price before you buy it.

You don’t have to have a Kindle to take advantage of these deals. You can download Free Kindle Apps for your Computer or Smart Phone.

Blogging 101: How to Create Effective Internal Links

The effective use of links can increase page views, encourage engagement, and improve your credibility. Internal links to previous posts allow you to refer your readers to related content without boring those who have already read it by restating the information. You should aim to have at least one internal link per post. If possible you should have a link in the body of the text (Related content links at the end of your post are great, but they don’t meet this requirement). For maximum effectiveness, you should use key words as your anchor text.

Linking Don’ts:

Click here. <- Key Word Fail!

http://bloggingforfoodies.com/using-key-words-in-your-posts-to-increase-blog-traffic/ <- Including the actual URL in your posts disrupts the flow and makes you look like an amateur.

Your first priority is to your current readers; your second priority is to people searching on your topic. <- Don’t link an entire sentence, especially if that sentence doesn’t use a key phrase that represents the content of the post you are linking to.

Remove Word Verification! <- Don’t link to posts that are not related to the topic of your current article.

How to Create an Effective Internal Link:

Use Internal Links to Increase Page Views

1. Choose the key words you want to use as the anchor text for your link. You don’t have to write the exact post title; choose words that flow with your text, but still describe the content of the post you are linking to. Since we are talking about key words, this would be a great time to insert a link to an article on how to incorporate keywords in your posts.

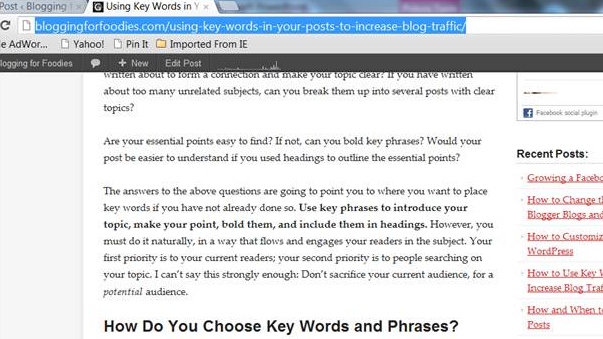
2. Open the post you want to link to in your browser. Select and copy the post’s URL. (See the image above).

3. Select the words that you are using as your anchor text (Hold the left button down on your mouse and run your cursor over the words you want to select. The words will appear highlighted) .

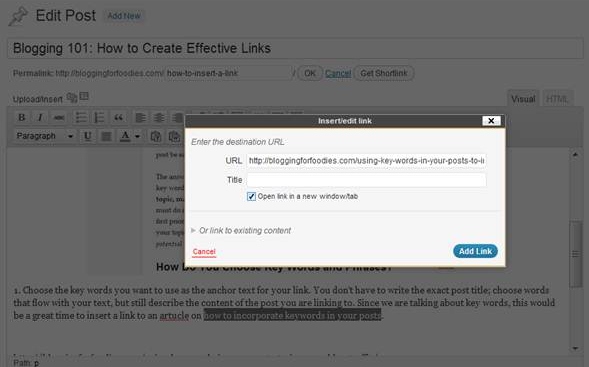
4. Click on the link button in your tool bar. (It looks like a 3-link chain on WordPress and it says “Link” on Blogger).

5. A box will pop up. Paste the URL in the box.

6. Click “Open in a new Window”. This is optional, but most foodies appreciate it if a link opens in a new window. This enables them to easily refer back to the original post.

7. Click on the “OK” button if you are on Blogger or click on “Add Link” if you use WordPress.

Create Effective Internal Links to Increase Page Views

Internal links can improve your readers experience by providing them easy access to an article on a topic they are interested in. It can increase page views because it keeps readers on your blog, reading your articles. As they read more of your posts on a particular topic, you build credibility with your readers (assuming the linked posts are good and useful). And if your readers find your content helpful, they are more likely to follow your blog and share your posts on social media.

Related Content (Really useful information, but these don’t count as internal links. Since this is the end of my post and you are probably getting ready to leave, I don’t have these links open in a new window):

How to Create a Blog Title that Will Increase Traffic

Increase Traffic by Naming Your Images

How to Grow a Facebook and Increase Engagement

How to Change the Title Format on Blogger Blogs and Increase Traffic

So you have written great titles for your posts, you have named your images, and you have used key words in your posts. You have done quite a bit to improve your Search Engine Optimization (SEO) and your posts are beginning to move up on the results pages. But  there is one more thing you can do to improve your chances of being chosen from the other posts on the Search Engine Results Page (SERP) and attract more traffic to your blog.

Why Change Your Title Format on Blogger?

You can change your blog’s Title Format, so that your post name comes before your blog name. Why would you do that? Because your post title most probably contains the key words the searcher used, so that puts the words that they are looking for at the beginning of the search result. If you have a long blog name (guilty) the searcher might only see your blog name and a portion of your blog title and that might not be enough to encourage them to click through to my post.

For example:

I wrote a post on How to Make a Substitute for Herbamare. Since I realized that a lot of my readers would not know what herbamare was, I added A Seasoned Salt Recipe to the end of my blog title, thus creating the longest blog title ever.

Search engines send me a lot of traffic from people looking for a homemade herbamare recipe, but they also send me a lot of traffic from people looking for a Seasoned Salt recipe. However, if my blog name came first, searchers would not see most of my post title and my traffic would be greatly reduced no matter how high up I landed in the SERPs.

The Search Engines will only show the first 60 characters of your post title/ blog name. So if my blog name was first,  it would look like this on the SERP:

Premeditated Leftovers | How to Make a Substitute for Herbam…

I might still pick up traffic from people searching on Herbamare, but it would probably be reduced. And I wouldn’t pick up much, if any, traffic from people searching on “How to Make Seasoned Salt”.

With this tip I am going to show you, my post shows up like this in the results:

How to Make a Substitute for Herbamare – A Seasoned Salt Rec…

Which makes it easier to understand why I get quite a bit on traffic for both Herbamare Substitute and How to Make Seasoned Salt.

How to customize Title Format and increase traffic

How to Change Your Title Format in Blogger:

1. Click on Template

2. Click on  Edit HTML.

3. Click Proceed, but if you are nervous after reading the message, you can back up your blog first. 🙂

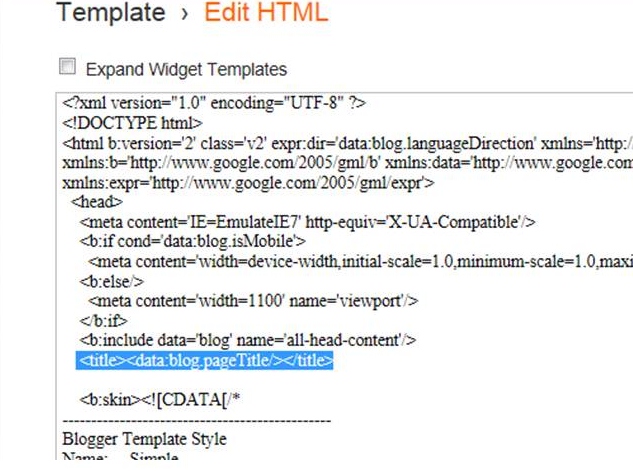
Near the top of your html code you will see (above image):

<title><data:blog.pagetitle/></title> if you don’t find that , you may find: <title><data:blog.title/></title>

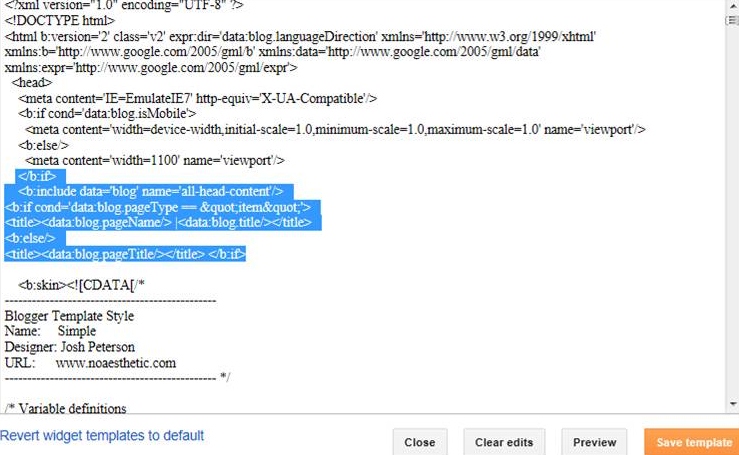
4. Replace the above piece of code with this:

<b:if cond='data:blog.pageType == "item"'>
<title><data:blog.pageName/> |<data:blog.title/></title>
<b:else/>
<title><data:blog.pageTitle/></title> </b:if>

4. Click Save Template. If you get an error message, click clear edits.

Improve appearance on SERPs by changing Title format on Blogger

The change will not take place immediately. The search engines need to crawl your site, before the change will show up on the Result Pages. It will show up immediately when you tweet a post though. I used my old gardening blog to create this tutorial. After completing the process, I tweeted one of the posts (from twitter installed on my dashboard, not buttons below post) and this is what popped up:

Freezing Berries |One Determined Gardener http://www.onedeterminedgardener.com/2010/11/freezing-berries.html

Changing the Title Format allows the Post Title to capture the attention of a larger audience. If I had the blog title/post title format on the above tweet, it would only be noticed by gardeners. With the Post Title first, anyone with excess berries, will take notice.

Now make it easier for those who find your blog to leave a comment and Remove Word Verification!

How to Customize Your URL in WordPress

You can customize your permalink settings to help improve your SEO. You can also use a plugin to change your title formats, so that your blog name doesn’t show up with every post title.

I have already discussed how you can customize the permalink for a particular post. These tips that I am sharing today address how to change the appearance of your post titles and will apply to all of your post titles.

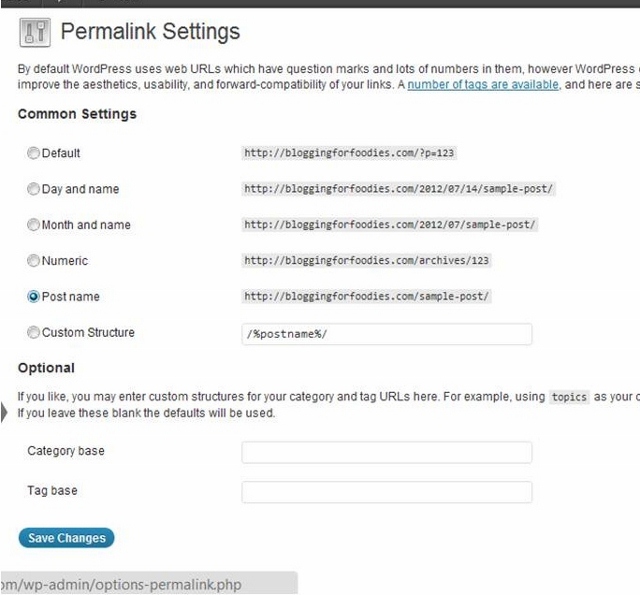
The default permalink setting in WordPress is http://bloggingforfoodies.com/?p=123.  I don’t know why, but I do know that ?p=123 does not convey any information about your post. Instead of using the default, click on the post name option to create custom permalinks.

How to Change Your URL Title Format to include Post Name


How to Customize Your Permalink (URL) in WordPress:

1. Click on Settings.

2. Scroll down to Permalinks and click on it.

3. You will notice that the default setting looks like http://bloggingforfoodies.com/?p=123

4. Click on the  Post Name option which looks like http://bloggingforfoodies.com/sample-post/

5. Click on Save Changes.

If you are afraid that by making this change, you will have problems with old links install the Permalink Finder plugin. This is a great tool that redirects old URLs to new URLs and then notifies the search engines of the changes.

Now you can change your title format if you wish. Why would you do that? Well, changing your title format allows you to change how your post title looks in search engines and how it appears when people share it on social media. If you don’t change the format it will look like:

Why You Should Remove Word Verification | Blogging for Foodies

Once you change the title format, just your post title will appear:

Why You Should Remove Word Verification

This presents cleaner results in search engines and leaves room in tweets for people to leave a comment about your post.

 Use All in One SEO Pack to Change Title Format

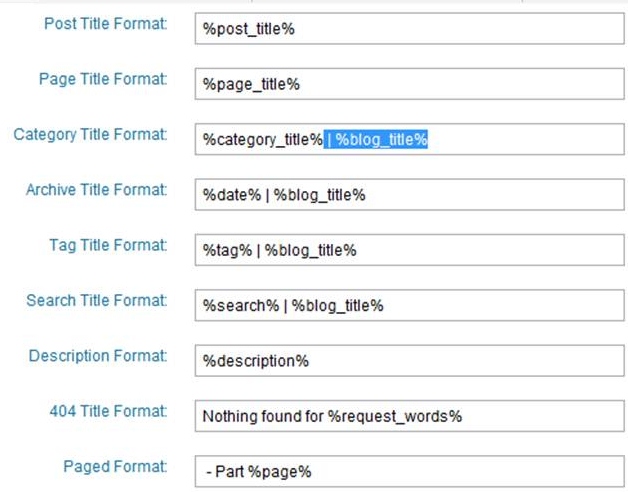
How to Use All in One SEO Pack Plugin to Customize Your Title Formats:

1. Click on Settings.

2. Scroll down to All in One SEO and click on it.

3. Scroll down to the Title Formats. The first one will be Post Title Format and will look like: %post_title% | %blog_title%

4. Highlight | %blog_title% and then click delete.

I remove | %blog_title%  from each Title Format. I feel it is redundant and can be distracting in SERP (Search Engine Results Page) and on social media. If you are new to WordPress, this video will help you learn how to implement the All in One SEO Pack Plugin.

How to Use Key Words in Your Posts to Increase Blog Traffic

How to use key phrases in food posts and recipesIf you use key words in your post titles and you add them when you name your photos, you have the luxury of using them sparingly in  the content of your post. You want to write naturally. You don’t want to stuff your post with key words because it will seem forced and you will annoy your readers.

So my first suggestion is to completely ignore key words when writing your post. Write about whatever it is that you want to share and do not think about Search Engine Optimization (SEO) or Search Engine Results Page (SERP).

Where Should You Place Key Words?

After you have written your post, edit it and ask yourself these questions:

What is the point of your post?  Are you sharing a recipe, a tutorial, or showing your readers how to fix a problem? Do you state your intentions? Do you follow through?

Do you have a clear topic? If not, is there a way you can link the things you have written about to form a connection and make your topic clear? If you have written about too many unrelated subjects, can you break them up into several posts with clear topics?

Are your essential points easy to find? If not, can you bold key phrases? Would your post be easier to understand if you used headings to outline the essential points?

The answers to the above questions are going to point you to where you want to place key words if you have not already done so. Use key phrases to introduce your topic, make your point, bold them, and include them in headings. However, you must do it naturally, in a way that flows and engages your readers in the subject. Your first priority is to your current readers; your second priority is to people searching on your topic. I can’t say this strongly enough: Don’t sacrifice your current audience, for a potential audience.

How Do You Choose Key Words and Phrases?

Ask yourself what is it that searchers need to know about your particular post or recipe. What distinguishes it from similar content? How are you helping your readers by sharing this information?

Are you sharing a recipe made from scratch to avoid an ingredient contained in the processed version? Is your adaptation healthier than the typical recipe for that item? Is your recipe more frugal than a packaged, store-bought version? Have you simplified a traditional recipe?

Keep asking yourself questions until you have figured out what is unique about your post and why your readers should make your recipe  instead of one of the other variations that are out there. The answers to the above questions will provide you with the key words and “long chain” phrases to use in your post. By helping your readers understand why you chose to share a particular recipe, you are making it easier for searchers to find it. You may find this article on how to Build Keyword Density the Right Way helpful.

Sometimes using synonyms helps you broaden your reach through a variety of key words. And synonyms can make your article more interesting for your readers, but there aren’t a lot of synonyms for squash. There is a difference between word stuffing and genuinely only having one word that works for a particular recipe.

SEO Tips for Recipes:

You can make it easier for your readers to follow your recipes while making it easier for search engines to recognize your recipe in your post.

Put your recipe title in Heading 1 or Heading 2 (Or use the default heading in blogger).

Add the word recipe to your recipe name. You can do this a couple different ways; i.e., Recipe: Creamed Spinach or Creamed Spinach Recipe

If possible, only put one recipe per post. If your main recipe includes a sauce or frosting, define that recipe with a subheading in both the ingredient section and the instructions.

You should include the following terms: Ingredients, Directions (or Instructions), Prep Time, Cooking Time, Total Time, and Servings. The terms ingredients and directions (or instructions) should be in bold.

List your ingredients in a bulleted list, one ingredient per line.

List your instructions in a bulleted or numbered list. Do not put them in a paragraph! Use one line per instruction, even if your instructions are very short.

Be wary of anybody who tells you they have a proven recipe for SEO. It isn’t an exact science and the algorithms are constantly changing. And what works for one blogging community will not necessarily work for another niche. So watch your “came from” and “keyword activity” stats to figure out what works for you. Generally, if you make your posts and recipes easy for your readers to follow, you will also make it easier for search engines to find you.

How and When to Rename Images in Old Posts

Last week I told you how you can increase traffic by renaming your photos with key words. I know some of you are thinking “But I have over 100 posts with unnamed photos. How am I ever going to name them all?” Just thinking about it can be overwhelming. So instead of dealing with all those unnamed images, you decide to make the world a happier place by creating a recipe for German Chocolate Brownies.

I might know something about procrastination. Which is why I developed my own system for how and when to update image names. Some might call it lazy, and if you didn’t know better you might think it was a random and disorganized approach.  But I like to think of it as a deliberate and strategic plan for naming old images. That’s my story and I’m sticking with it.

My Strategy for Renaming Old Photos:

Don’t create any more old, unnamed images. Make a commitment to name all of the new images you upload so you do not create more work for yourself. It takes less time to do it correctly now, than it does to go back and fix it later.

Update images in posts as they become relevant. I did not start with my oldest post and systematically update each image. I rename images as they become timely and in season. There is no reason to update posts on Christmas in August. Instead update your images on recipes for seasonal produce, canning, making jam, drying herbs, picnic inspiration, etc. In other words rename the photos in posts that are on subjects people are searching for now.

Update images before they become relevant. People start searching on some recipes and topics a few weeks to a month ahead of time. I use Pinterest to help me gauge when people start searching on different topics. When I see a trend emerge, I search for posts I have on that topic and update the photo names.

Update Images as you link to old posts. When I link to an old post, I take the time to make sure the post I am linking to has named photos. I also check to see if the images have names before, I share an old post on Facebook. You can do a quick check, by running your mouse over your photo and see what name pops up in the box.

When short on time, just rename the first image or the best image. When time is short and I am faced with an old post with lots of pictures, I just rename 1 or 2 images instead of all of them. Hopefully your first image is your best image, if not, try to find the time to name them both.

This system means that there are still unnamed images on my blog, but I am not worried about it. If I feel those old posts become topical, I will update them.

How to Rename Old Images in Blogger Posts:

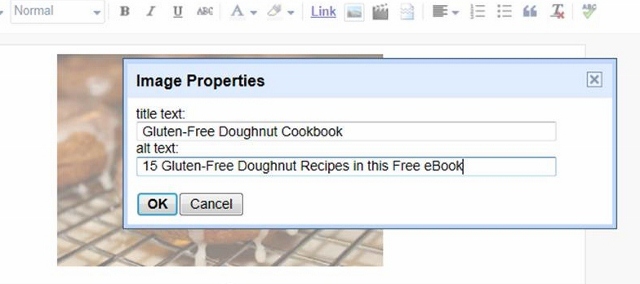
If you use Blogger, you can go back and add a title and alternate text to your image.

How to add a title and alternate text to images on blogger blogs

1. Open your old Blogger post in Edit mode.
2. Click on your picture and a tool bar will appear below your picture.
3. Click on Properties.
4. Then fill in the Title and Alternate Text fields.
5. Press OK to save changes.

Repeat for other images in the post.

How to Rename Old Images in WordPress Posts:

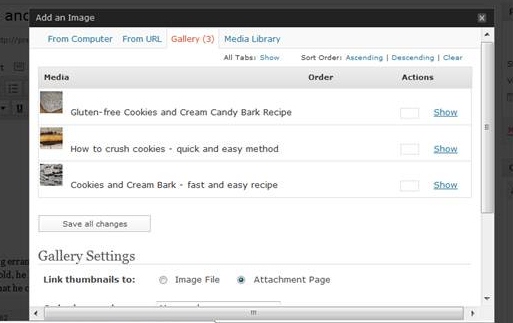
If you use WordPress, you can go in and add titles and alternate text to multiple images easily.

How to Add Title and Alt. Text to Unnamed Images in WordPress Posts

1. Click on Edit Post.
2. Click on Add Image.
3. Click on  Gallery. The Gallery will open with all of the images from that post.
4. Click on Show for the image you want to edit.

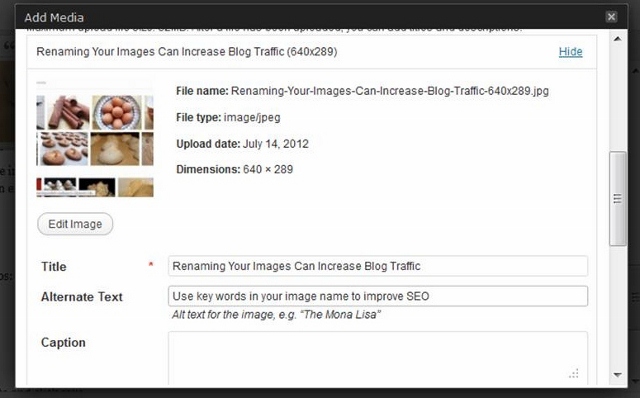
Add key words to the alternate text field to improve your SEO

5. Fill out the Title and Alternate Text fields.
6. Click Show on the next image you wish to update and repeat step 5.
7. Scroll down to below the last image and click the Save All Changes button (it is just above the Gallery Settings).

As I stated in my post on How to Increase Blog Traffic by Naming Your Images, you don’t want to overuse key words or stuff your images full of key words;  just use the title and alternate text fields to share what is truly relevant to those doing a Google Image Search.

Do you have a different strategy for renaming old photos? Let me know in the comments and/or come share it with us on Blogging for Foodies Facebook Page!

Related Posts:

Create Post Titles that will Increase Your Blog Traffic 
How to Increase Blog Traffic by Naming Your Images

Increase Traffic by Naming Your Images

You have created a delicious recipe. You made your hungry family wait while you  photographed it from every angle. You wrote a charming post with a traffic boosting title. You even spell checked your post. You’re ready to hit publish. Wait!

Did you name your photos?

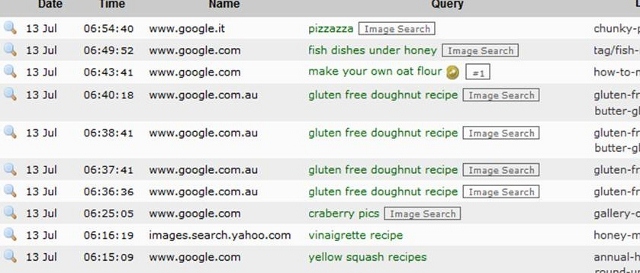
If you are like most food bloggers, you have probably overlooked this simple step. And naming your images wisely has the potential to move your post to the head of the line in Google searches.

In the above image, you can see that some of my traffic is coming from Image Searches on Google. People don’t just want a recipe, they want to see what the final product of that recipe, and many people want to see it as early in the search process as possible so they use Google images.

Scroll over some of the pictures on your blog posts. When you scroll over the image a box will pop up with the image’s name in it. What does it say?

June2010(35).jpg is not a good name. Neither is PBCookDec15.jpg. and IMG_1828.jpg tells you nothing about the photo. Now edit the photo, what is written in the alternative text field? Is it blank? We need to fix that right away!

Take the Time to Rename your Image!

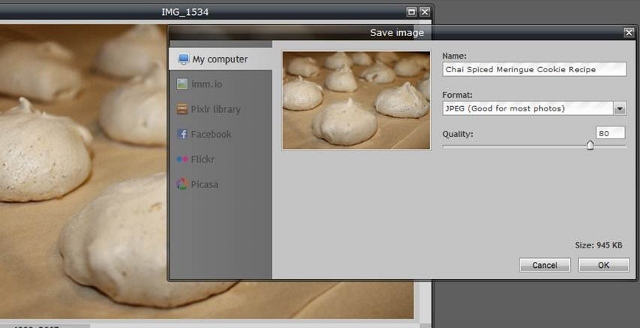
After you crop your picture in your photo editor, rename it with a name that uses key words from your post or recipe. When you hit save in Pixlr or PicMonkey, it gives you the option of changing the name of the photo. Use a keyword rich name now! You may find the “rename” option under properties in your photo editor. If you cannot find the rename option anywhere on your photo editor, simply click on “save as”, rename your photo, and then save it as a jpeg.

Using Pixlr, I changed the image’s name from IMG_1534 to Chai Spiced Meringue Cookie Recipe. You don’t need to overload your image name with key words, just put in enough to help a searcher find your recipe in an image search.

Use key words in the alternative text field on your images image to improve SEO

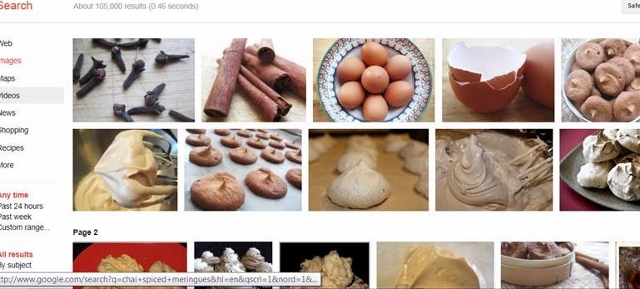
My cookie picture is not going to win any awards, but it is right there front and center in the image results from a Google search. Even though my picture is not that good, it is going to perform better than all of the gorgeous, unnamed pictures. So I really shouldn’t be sharing any of this information with you skilled photographers. 🙂

Google’s image results appear differently than Google’s other search results. You can easily scroll through many pages of image results, instead of having to click on a new page for every 10 results. So this means that even if your images are much further down in the search results they are more likely to be seen and will do better than if they were in the same position in Google’s Web results.

Don’t name all of the images in a post the same name with a number after it (peanut butter cookie (1), peanut butter cookie (2), etc.) Instead use the opportunity to share slightly different variation of the key words from your post to capture more searchers.

Add a Title and Alternate Text to Your Images:

If you use Blogger, you can also add more key words by adding a title and alternate text to your image.

How to add a title and alternate text to images on blogger blogs

Click on your picture while you are in edit mode. A tool bar will appear below your picture. Click on properties. Then fill in the title and alternate text fields. Press OK.

If you blog using WordPress, you have another chance to add key words to your image by filling out the Title and Alternate Text fields when you upload images to your blog.

Add key words to the alternate text field to improve your SEO

Make sure you fill out the  alternate text fields when you load images to your WordPress blog. Although Google doesn’t read the image title, some pinning apps pull it and use it as the title of the pin, so go ahead and fill it out. As I stated before, you don’t want to overuse key words or stuff your images full of key words;  just use those fields to share what is truly relevant to those doing a Google Image Search.

Related Posts:

Create Post Titles that will Increase Your Blog Traffic 

Create Post Titles that Will Increase Blog Traffic

You know some of your posts are gems and you’ve shared some great recipes, so why aren’t more people showing up to your blog? Your titles are catchy. They’re interesting and funny.

And that could be part of your problem!

If you want more traffic for your food blog, you need to make it easier for people to find your content while doing a Google search. Catchy titles might actually make it harder for people to find your content. Your title will not help you in Google searches unless it contains the words that people use when they are searching on a topic. If you used a play on words or song lyrics or put a hook in your title, you may be accidentally sabotaging your blog. And if your funny title does generate some traffic, those viewers might have been looking for something funny and be quite disappointed with a recipe for broiled tomatoes.

A Tale of Two Posts

In real life I am a goofball and that crops up at the oddest times when I blog. In the early years, it often appeared in my post titles. I would write a totally serious post and then on a whim give it a ridiculous title. Which is how my post on making French Vanilla Creamer ended up being called “Making Your Own Legal Stimulants“. My regular readers didn’t have a problem with my title and even shared it with their friends, so I received a little traffic. But a few weeks down the road, I started noticing traffic coming from Google searches for “how to make legal stimulants”. I am pretty sure anyone who arrives at my creamer post from a search on stimulants is very disappointed. Since those people are not finding what they are looking for, they are not going to look through my other posts and they are certainly not going to subscribe.

Three years after sharing my creamer recipe, I decided to share it again. This time I kept all of my goofiness inside my post and even though it contains at least one drug reference, I named the post Homemade French Vanilla Creamer. I realize that most of the people who arrive through Google searches skip over my silly story and go right to the recipe, but that is okay, because they find what they are looking for, like it enough to share the post, they view my other recipes, drop me a note, and occasionally subscribe to my blog.

All traffic is not created equal

If you have been around the blog world for any time then you have heard the term Search Engine Optimization (SEO) bandied about. SEO refers to a web site or blog page’s visibility in search results. The higher your post comes up in search results, the more likely it is to receive traffic. For a long time both of the posts I mentioned above were in the first 10 results produced by a Google search using terms in the post titles. Being in the top 10 seems like a good place to be, but it isn’t if you are there based on key words that do not match your post’s contents or your blog’s philosophy or mission.

Food Bloggers Don’t Need a Device to Hook their Readers

Many bloggers use a device, technique, or hook in their articles’ titles because they are trying to stand out from the pack. Or they are trying to create “buzz”. As food bloggers, we don’t have to do that. Growling tummies create more than enough buzz and while some recipes are seasonal, food never goes out of style.  Everybody eats, but few people know how to cook, so we don’t have to worry about our niche becoming overpopulated. We just have to worry about helping people who like our cooking style find us. Every day millions of people are searching Google to figure out what to make for dinner that night. If you have buried your potato salad recipe under the title “A Walk in the Park” and a post about a family picnic, those people searching for a potato salad recipe are not going to find it on your site.

You have to make a decision: Are you a food blogger who shares stories with your recipes or are you a lifestyle blogger who peppers your stories with recipes. If you are the former, own it and give yourself permission to title your posts with recipe names, i.e. Easy Potato Salad, Italian Potato Salad, Potato Salad with Zucchini, or Old Fashioned Potato Salad.

The words, terms, and phrases that people enter in the box when they search on a topic are referred to as key words. When you select a title for your posts, think about what your post contains that people may be searching for and work those words into your title. You don’t have to use a formula and it doesn’t have to be a perfect match, but your post title should convey the essence of what is important to a searcher in your post.

If I had put some thought into my post title on creamer, I would have named it “How to Make French Vanilla Coffee Creamer” because it contains  more of the words people use when searching for how to make coffee creamer and allows for more combinations of those words, but the second title is good enough to be of use to searchers. You don’t need to stress too much about trying to get titles perfect because there are still  opportunities to use key words in the post (and I will talk about those later this week). Just take a minute before you hit publish to reflect on whether your title will help someone find your recipe.

If your blog is on WordPress you can do a couple of things to tinker with your title and improve SEO. The first thing you can do is edit your title.

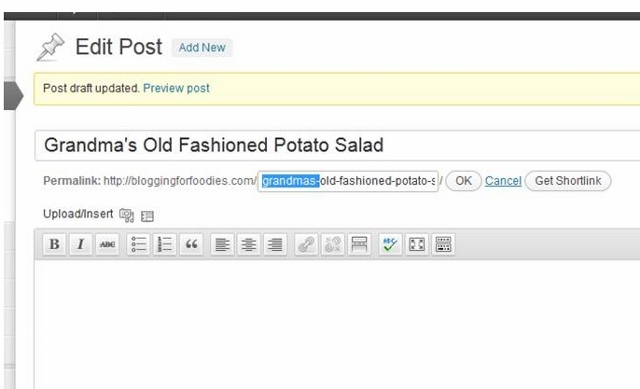
Do you refer to your potato salad as Grandma’s recipe. Go ahead and call your recipe by its name in your post title, but then edit out the word Grandma in your permalink, since “grandma” is probably not going to be included in any Google searches for potato salad.


How to Edit Your Post Title in WordPress:

Write your post title. Then hit Save Draft.

Underneath your post title is the Permalink. Click on the edit button at the end of the permalink.

Highlight the words you want to remove, plus any excess dashes and hit the delete button. Now click on the OK button and you have a new permalink.

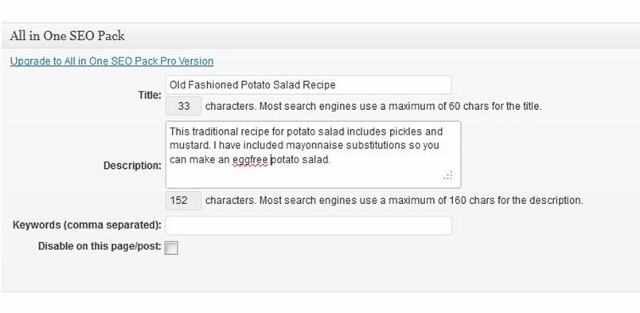
If you are using WordPress, you can also use the All in One SEO Pack Plugin to change how your post looks in search engines. If you are new to WordPress this is a great tutorial on how to implement the All in One SEO Pack Plugin.

Since many people include the word “recipe” in searches for recipes, I use the All in One SEO Pack to add Recipe to my title in search results. I can also include information in the description to help searches see what is unique about my recipe or see that it includes certain ingredients or avoids allergens.

How to Create a Custom Permalink on blogger Posts

How to Create a Custom Permalink for Blogger Posts:

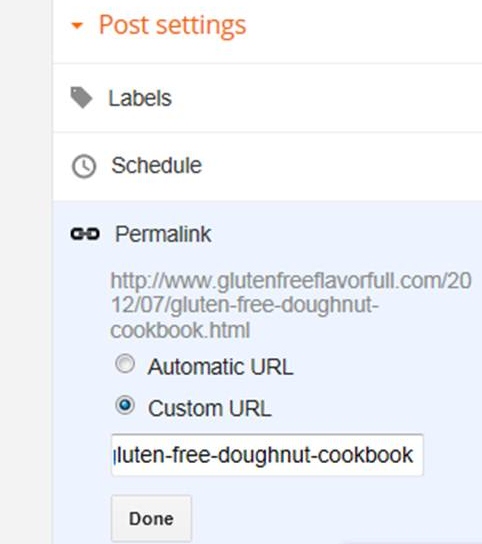
The latest version of Blogger allows you to create a custom permalink. Thanks Micha of Cookin’ Mimi for sharing this tip in the comments!

To edit your permalink, click on Post Settings (on the right side when editing your post).

Scroll down and click on Permalink.

Click on custom URL.

Type your custom URL in the text box. Be sure to put a dash between each word: old-fashioned-potato-salad

Click on Done.

Although I am not sharing a recipe today, I still followed my advice for writing a post title. I didn’t succumb to my desire to use “A Tale of Two Posts” as my blog title, instead I summed up the essence of what this post is about in my title. I reread the post and thought I sounded a little bossy, since I’m too lazy to go back and change my tone I decided to phrase the title in the form of a directive.

If you want input as you create blog titles, ask for help from fellow foodies on the Blogging for Foodies Facebook Page.

Confession time: What is your craziest post title? Make me feel a little better about my “legal stimulants” and share your wildest post title in the comments.