Free eBook: Ultimate SEO 2012 Report

I just downloaded SEO Ultimate 2012 Report: Search Engine Optimization for Today’s Internet & Google for FREE on to my Kindle. I have only just started reading it, but so far it is written in an accessible manner and is very thorough.

I don’t know how long the SEO Ultimate 2012 Report  it will remain at this price, so check the price before you buy it.

You don’t have to have a Kindle to take advantage of these deals. You can download Free Kindle Apps for your Computer or Smart Phone.
FREE eBook: You are a Writer (So Start Acting Like One)

I just downloaded You Are a Writer (So Start Acting Like One) for FREE on to my Kindle.

The  author Jeff Goins says, “This is an eBook about a journey of becoming a writer. It’s a guide to writing and publishing, including how to navigate the world of platform-building and getting your work noticed. Mostly, it’s about believing in yourself. About the process of self-doubt we all go through and the declarations we make to do what we’re made to do”.

You can currently download You Are a Writer (So Start Acting Like One) for free. I don’t know how long it will remain at this price, so check the price before you buy it.

You don’t have to have a Kindle to take advantage of these deals. You can download Free Kindle Apps for your Computer or Smart Phone.
Make Money Working as a Freelance Writer

Make Money Working Online

Earning money through monetizing your blog can take time. So today I wanted to tell you of another way that you can earn money while you are figuring out which ads and affiliate programs work for your audience. It still involves your blog though.

You can trade on your blog’s credibility to work as a freelance writer. Your blog is an easily accessible display of your writing capability and your knowledge on specific subjects. Even if you haven’t worked as a freelance writer before, you can cite your own posts as an example of your work. Once you have written a few articles for other blogs or magazines, you can cite those articles in addition to your blog.

Where can you find work as a freelance writer? 

I landed my first freelance job on the recommendation of a friend and it was based on my knowledge of Greek. How obscure is that? I share it so that you don’t set self-imposed limits on the topics you think  you can write about. You may have a skill that you take for granted that will prove useful to a specialized audience or magazine. That Greek article led to a great job that paid off our truck.

Almost every magazine has contact information online or in their magazine. They usually just provide a name and email, but occasionally provide general guidelines for writing for their publication. Print magazines generally pay much better than blogs. For more information, read this thorough article on How to Get Paid to Write for Magazines.

So if magazines pay better, why do I write primarily for blogs? I like the faster publication timeline and the informality of writing for blogs. As with print magazines, when you become established you will be able to command more per article. Here are a few resources for finding paid writing assignments for online sites:

Jobs for Bloggers at Problogger

The Ultimate List of Better-Paid Blogging Gigs

I often see people looking for freelance writers on Twitter. I recommend following the blogs and magazines you are interested in writing for on Twitter. You can even create a list, so you can easily scroll through their tweets. This will give you a heads up on the topics they are interested in or their writing needs that you can fill.

Have you worked as a freelance writer? Share your experience in the comment section.

How to Increase Blog Traffic with Pinterest

While the rest of the blogosphere was pondering Pinterest, complaining about it, and talking about how it would never become a significant social media like Facebook or Twitter, Foodies were quietly dominating the Pinterest boards. Image rich posts like recipes and tutorials do really well on Pinterest.  Here are a few tips to maximize your usage of Pinterest to increase traffic to your blog.

Use Pinterest to increase your blog traffic

Use Pinterest to Grow Your Blog

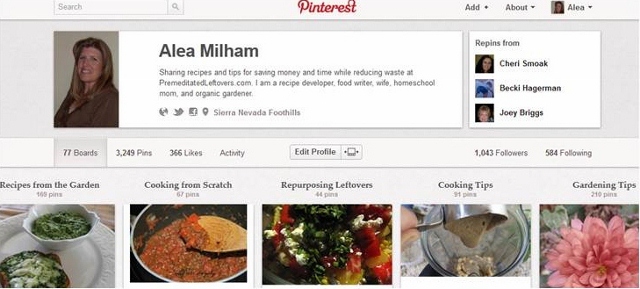
Make sure you have filled out your profile and linked to your blog, Twitter and Facebook Page. I cannot tell you how many bloggers forget to add a link to their blog. If another pinner likes your pins and clicks on your profile to see if you have a blog and you don’t have a link…they will just move on…and you will have lost a potential follower. Always include a link to your blog on your social media profiles!

Create boards that are an extension of the topics you blog about. If you blog about food, don’t have one board titled “Food I Like”. Break your food boards down by topic: Appetizers, Soups and Stews, Desserts, Fast Dinner Recipes, etc. Then pin items that you discover that fit those categories to those boards.

Arrange your boards so that the board topics that most people connect to your blog are at the top of your wall and your personal boards are at the bottom. You can also rearrange your boards to place seasonably appropriate boards at the top of your wall. Once people are following you they will find your pins in their stream. However, before they follow you they will check your wall to decide if they want to follow you.

Share your reader’s posts on Pinterest. I often pin posts that I discover on the blog hops that I co-host. Pinterest also allows you to share your pins on Facebook and Twitter, so you can share over several different medias at once. Adding the “pin it” button to your tool bar makes this process fast and easy.

Add the “Follow Me on Pinterest” button to your sidebar. You will find the directions for adding the button on the Pinterest Goodies page.

How to Generate Traffic From Pinterest on New Posts

Remember, not every post is pin-worthy. Posts without pictures or posts that are visually uninteresting won’t do well on Pinterest. Other types of posts that should not be pinned: sales, giveaways, coupons and most reviews.

You need at least one good picture of the final product for a pin-worthy post. Tutorials with multiple pictures on just about any topic do well. Posts pinned to Pinterest do not need to be as jazzy as those that are stumbled. Pinners have a longer attention spam than stumblers and are looking for some meaty content as well as a good picture.

You can add a “pin it” button to your post. WordPress users can use the “Post It On Pinterest” plugin. The plugin allows you to choose the picture and text to go with your pin. WordPress users can also add the “Pinterest button to their ShareThis buttons.

Unfortunately, there is not a plugin that I know of for bloggers, but you can create a custom pin for a particular post. You will find a form to create your custom pin in Pinterest Goodies. Even with the form, it is a bit time-consuming, so I recommend adding this only to posts that you think people will want to pin – be objective!

Generating Traffic and Income from Old Posts:

People are finding my old posts by doing a Google search, then pinning the post, which creates traffic for my old posts. Another way to generate traffic for your old posts is to pin your old posts as they become relevant again.  When you notice that fellow pinners are pinning posts on a certain subject review your old posts and see if you have any relevant posts to add.

Once you find that one of your old posts is being pinned, optimize it!

Go over old posts that have been pinned and check to make sure all of the links work.

Check to see if there is a natural way to monetize the post with something that is relevant. If there isn’t, it is better to leave the post unmonetized than to annoy your readers.

Add related links. I like to do this by hand rather than allow a plugin to do it because I can pick the posts that I feel are mostly like to interest those that land on that page. For instance, most of the people who pin my post Ideas for Reusing Kleenex Boxes pin the picture of the marshallow catapult, so I know they are looking for ideas for children. A plugin would probably link “reusing” or “repurposing” posts, but I hand-picked “frugal fun ideas for kids” posts when creating “related posts” to appeal to the people who were arriving at Ideas for Reusing Kleenex Boxes and generate more traffic for my blog.

Final Tips for Pinterest

When people create a board, they assign a category to it, so when they pin your post to a board it is seen not only by their followers, but anybody who has expressed an interest in following that category. Your post is in their stream for a day or two, unless it continues to be pinned and goes viral, but it remains on their board unless they remove it. Even if the pinner has few followers, their pin is seen longer than it would be on faster moving social medias.

Pinterest has allowed me to get to know my readers and my readers to get to know me at a different level. Because I have personal boards in addition to my blog-centric boards, my readers see a different side of me and I see who is planning a wedding, who has an Angry Birds addiction, who is redecorating a room, who is homeschooling, and who has rambunctious children and pin tips for keeeping them entertained.

I find it easier to limit my time on Pinterest than other social medias because I can quickly look through pictures and push repin if I see something I like. I don’t have to think of a witty response, I just click through to verify that it is a legitimate pin,  hit repin, pick a board, and I am done. The same pins move up and down the boards throughout the day, so you don’t have to spend a lot of time on Pinterest to see what is being pinned. I spend 5 -10 minutes 2 -3 times a day. If you find it addictive, set a timer.

How are you using Pinterest?

Related Posts:

How to Grow a Facebook Page and Increase Engagement

How to Link to Specific Social Media Statuses in Posts

Monetization Monday: How to Monetize Your Blog with Coupons

Tips for Making Money with Your Blog

We all start blogging for different reasons, but even if we didn’t start blogging to make money we have heard the rumors that it is possible. But how do you make money when you are giving your recipes away for free? When you are a new blogger, businesses are not exactly pounding on your door asking to pay for a premium spot on your blog. And if you only have a couple hundred visitors each day, how can you convince businesses to take your cold calls (or cold emails) seriously?

The good news is you don’t have to worry about sending or receiving emails from businesses to make money. You can join an affiliate program.

Affiliate programs are a nice place to start with monetizing your blogs because they do all the work. They find the companies, they generate the buttons and the code. All you have to do is sign up, decide which advertising campaigns are a good match for your readers, grab the code, and place it on your blog.

Each Monday, I am going to talk about different ways to make money either on your blog or with your talents on a different platform.

How to Monetize Your Blog with Coupons

Coupons don’t make a lot of money per click, but lots of people use them and readers come back when new coupons are released. So they can be a regular source of income.

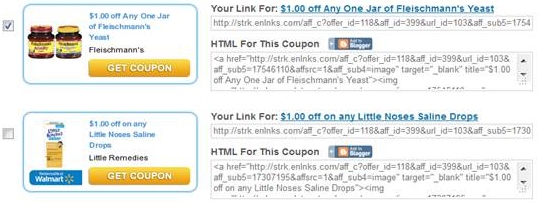
My favorite site to use to find coupons is Escalate Network. Escalate pays $0.42 per print session + $0.18 per “new user”. Escalate also makes it incredibly easy for you to include posts on your site. They have a Coupons.com Tool that allows you to check which coupons you want to use. After you have checked the coupons you like, you click Generate HTML (You have a choice of doing images or text). Copy the code and paste it into your post using the HTML Editor instead of the visual editor.

How to make money on your blog with coupons

How to Use Coupons on Your Blog:

You can create a post filled with a variety of coupons. You could have one post a week devoted to coupons.

You can write a short post focusing on just one coupon. Focused posts do just as well, sometimes better than lengthy coupon posts. They allow you to choose just the specific brands that you like and are mostly like to be brands or products that your readers will use. So I could write a post and include a link to the $1.00 off coupon for yeast and then include links to my posts that use yeast.

I could also do a search for all my posts that use yeast and then include a link to the yeast coupon on those posts. Anybody who comes to those posts through any source would then be exposed to that coupon. When I monetize old posts with coupons, I try to remember to remove the coupons after they expire, but since the image is hosted on Escalate Network and they change the image to say expired, I don’t feel too bad if I forget one.

You can add a Coupon widget in your sidebar with Escalate Network’s widget tool.

You can create a Coupon Page with Escalate Network’s iframe tool.

Disclosure and Monetization:

If you monetize your site, you need to let your readers know. Legally, you should have your disclosure policy in a high-profile spot somewhere on your blog. I like to have a Disclosure Page, You can find it at the top of my blog under the header (You can quickly create a disclosure for free at Disclosure Policy. Answer the questions with the best match and then edit the resulting document if necessary).  I also like to include a disclosure at the bottom of each monetized post.

Disclosure: This post contains an affiliate link.

Is NetworkedBlogs Reducing Your Page Views and Your Link Juice?

You spend so much time maintaining your blog, creating solid content, finding pictures, optimizing SEO, and managing your social media outlets, so when you find a time saver you want to take advantage of it. And I am all for time savers. Unless those time savers hurt your blog.

Many bloggers use NetworkedBlogs to automatically send their posts to their Facebook page. It is easy to use and appears to be a time saver, but in reality it is reducing the page views you receive from Facebook. How come? Networkedblogs opens the link to your post in an iframe if your reader clicks on the image or post title (they include a link to the full article at the bottom of the status, but most people don’t know to click there). So your followers are not actually clicking through to your blog to read the post, they are reading it on a NetworkedBlogs iframe. NetworkedBlogs is getting page views for your posts read by your followers.

Instead of getting link juice from NetworkedBlogs, you are losing page views.

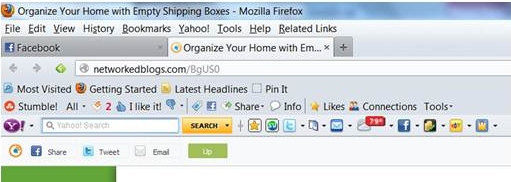
How do you know that you are on a NetworkedBlogs iframe instead of the actual blog you thought you were visiting?

1. Look at the URL. Notice in the above image that the URL includes www.networkedblogs.com

2. Look at the flavicon. That is NetworkedBlogs’ flavicon, not the blog’s flavicon.

3. Look at the grey tool bar that is installed right above the post. If you click on those share buttons, you will share a link back to NetworkedBlogs iframe, not to the actual blog post. Which means that when your readers click on one of those social icons Networkedblogs receives your link juice in addition to your page views.

How to Share Your Posts to Facebook Without Using a Third Party Application:

After you publish your post, use the social share buttons at the bottom of your post to share your post to your Facebook Page.

I use the ShareThis plugin on my blog posts and can easily share to a variety of social media at one time. You can also customize what you say about the post and tailor it for the different platform audiences. The words you use and the picture you pick to go with the a link greatly affect how many people click through to read your article.

What if you publish your post in the middle of the night and don’t want to share it then? I have two posts that go live at 1:00 am when I am asleep.  I share the link on my social media accounts when I wake up in the morning. However, if you really need to you can schedule a post on Facebook.

Have you found any beneficial time savers?

How to Link to Social Media Accounts In Posts

There are times when you will want to link to a Facebook status, a tweet or a Pinterest pin in your post. Linking directly to the status has the advantage of bringing your readers up to speed on a conversation, without boring the readers who have already seen it. It also shows those who are not following you on those platforms what they are missing out on. By providing them with a link demonstrating how you use that account, you are giving them more incentive to follow you and participate.

How to Link Directly to a Facebook Status:

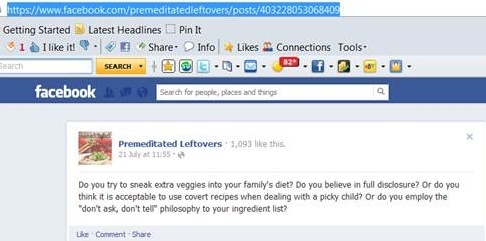
How to find the URL for a Facebook status

To create a link to a Facebook status, you need to find the URL (permalink) for that status.

1. Each Facebook status has a date and time stamp. You will find it right below your Facebook Page Name. In my case, below Premeditated Leftovers. It might look like 5 minutes ago, 18 hours ago, Tuesday, or 21 July. When you mouse over it, you will see the exact time and date that status was published. Click on the time stamp.

2. Once you click on the link, you will be taken to link for that status. Select and copy the URL.

3. Paste that URL into your link box to create a link. (Here is how to create an effective link)

Example using the above Facebook status as a link:

Yesterday, we had a discussion on how to get picky children to eat vegetables on my Facebook page and some of my friends pointed out that it isn’t just children who are picky. Since my husband learned to eat anything while serving in the Navy, it didn’t occur to me that spouses could be also be picky.

Although I talk a lot about key words, it really isn’t necessary to use keywords when linking to one of your social media accounts.

How to Create a Link to a Tweet:

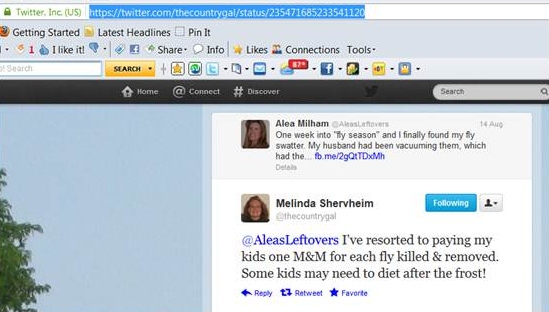
How to find the URL for a Twitter Tweet

Creating a link to a tweet on Twitter is similar to creating a link to a Facebook status.

1. On the top right of your tweet, you will find a time stamp. It can look like 15s, 3m, 5h, or 14 Aug. It is directly across from your name and Twitter handle. Click on the time stamp.

2. Once you click on the link, you will be taken to link for that status. (If the tweet is part of a conversation, the tweets before and after it will also show up). Select and copy the URL.

3. Paste that URL into your link box to create a link.

Example using the above Tweet as a link:

My friend Melinda shared her method for keeping her house free of flies.

How to Create a Link to a Specific Pinterest Pin:

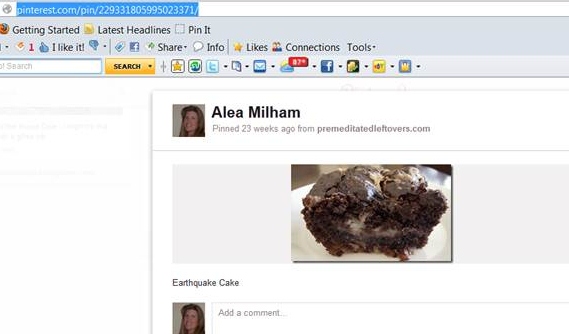
How to find the URL for a pinterest pin

If I wanted to tell my readers that my Earthquake Cake was described as a “chocolate love bomb” on Pinterest, I could use the opportunity to send them to the pin.

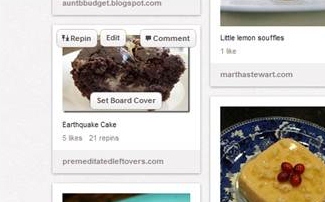
1. Ignore all the buttons surrounding the picture and click directly on the picture.

2. Once you click on the picture, you will be taken to link for that status. Select and copy the URL.

How to find the URL and create a direct link to a pin

3. Paste that URL into your link box to create a link.

Example using the above pin as a link. You don’t have to limit yourself to using these links in your blog post. I could use this link to create a Facebook status:

My Earthquake Cake was described as a “chocolate love bomb”: http://pinterest.com/pin/229331805995023371/

I know you have links to your social media on your side bar, but some readers will not recognize your link format as such, and still others have become desensitized to all the sidebar links and ignore them. Linking to your social media accounts in your blog posts can increase engagement across your various platforms. It also allows your readers to enter the conversation on a media that they feel comfortable using.

Blogging 101: How to Create Effective Internal Links

The effective use of links can increase page views, encourage engagement, and improve your credibility. Internal links to previous posts allow you to refer your readers to related content without boring those who have already read it by restating the information. You should aim to have at least one internal link per post. If possible you should have a link in the body of the text (Related content links at the end of your post are great, but they don’t meet this requirement). For maximum effectiveness, you should use key words as your anchor text.

Linking Don’ts:

Click here. <- Key Word Fail!

http://bloggingforfoodies.com/using-key-words-in-your-posts-to-increase-blog-traffic/ <- Including the actual URL in your posts disrupts the flow and makes you look like an amateur.

Your first priority is to your current readers; your second priority is to people searching on your topic. <- Don’t link an entire sentence, especially if that sentence doesn’t use a key phrase that represents the content of the post you are linking to.

Remove Word Verification! <- Don’t link to posts that are not related to the topic of your current article.

How to Create an Effective Internal Link:

Use Internal Links to Increase Page Views

1. Choose the key words you want to use as the anchor text for your link. You don’t have to write the exact post title; choose words that flow with your text, but still describe the content of the post you are linking to. Since we are talking about key words, this would be a great time to insert a link to an article on how to incorporate keywords in your posts.

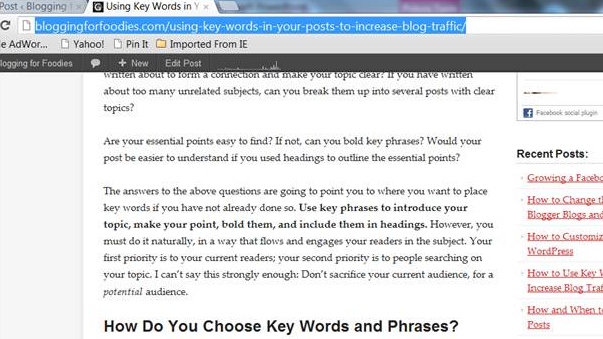
2. Open the post you want to link to in your browser. Select and copy the post’s URL. (See the image above).

3. Select the words that you are using as your anchor text (Hold the left button down on your mouse and run your cursor over the words you want to select. The words will appear highlighted) .

4. Click on the link button in your tool bar. (It looks like a 3-link chain on WordPress and it says “Link” on Blogger).

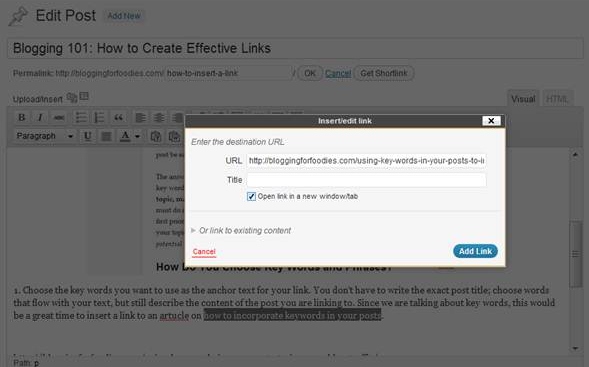
5. A box will pop up. Paste the URL in the box.

6. Click “Open in a new Window”. This is optional, but most foodies appreciate it if a link opens in a new window. This enables them to easily refer back to the original post.

7. Click on the “OK” button if you are on Blogger or click on “Add Link” if you use WordPress.

Create Effective Internal Links to Increase Page Views

Internal links can improve your readers experience by providing them easy access to an article on a topic they are interested in. It can increase page views because it keeps readers on your blog, reading your articles. As they read more of your posts on a particular topic, you build credibility with your readers (assuming the linked posts are good and useful). And if your readers find your content helpful, they are more likely to follow your blog and share your posts on social media.

Related Content (Really useful information, but these don’t count as internal links. Since this is the end of my post and you are probably getting ready to leave, I don’t have these links open in a new window):

How to Create a Blog Title that Will Increase Traffic

Increase Traffic by Naming Your Images

How to Grow a Facebook and Increase Engagement

Growing a Facebook Page

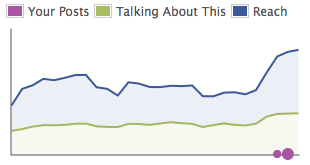
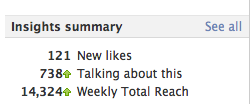
I asked my friend Beth to share how she has grown her Facebook page. I have been impressed with how she has grown her Facebook page organically, without contests and giveaways. Her authenticity is evidenced by the level of engagement on her page. I checked her stats before publishing today. Beth has 1555 likes for her page Aunt B’s Kitchen, but more importantly, she has 1027 people talking about her page. That is an amazing level of engagement! Beth isn’t just growing a Facebook page, she is growing a community.

Growing your Facebook Page and Increasing Engagement

When Alea paid me the great compliment of asking me to write a piece on how I’ve grown my Facebook page, I was both flattered and surprised. I’ve never felt that there was any great secret to what I do on my page, nor have I made any sort of formal plan for courting new “likes.”

I do know that I spend a lot of time on-line. Between writing, photographing, and promoting my blogs (there are four of them), and the time I spend interacting with readers on my Facebook page, I invest an average of 40 to 60 hours each week.

All this on-line activity is really a full-time job, and I’m very fortunate that my employer allows me to work on it during quiet times at my office. Even with that overlap, much of my “leisure” time is given to this project.

There is, for me, no fast and easy path to growing a page but I’ve come to understand that the process does break down into a few simple concepts:

Be Positive

Focus on happiness. Share things that make you smile. No one wants to listen to a Whiny Willie or a Critical Clara.

Be Polite

It should go without saying but, if a behavior annoys you on your page, it will annoy someone else if you do it on their page.

Be Present

Facebook is all about interaction. Your readers want to hear your authentic voice and to know what interests you. Share links, pictures, and posts you enjoy. Reply to comments made on your page. Comment often on posts and blogs made by other pages.

Facebook weights your posts in part upon their frequency and upon the frequency with which you “like” and comment on other posts. If you are going to absent yourself throughout the day, consider setting up timed posts, either through Facebook or through an application like Hoot Suite.

Even with timed posts, you should set aside some time both morning and evening to respond to comments, to visit other pages, and to scan through your activity log.

Be Kind

People will remember your kindness long after they’ve forgotten any posts you may have made.

Encourage people who are just starting out. Be generous in sharing links from other pages, and be generous with your praise for their work when doing so.

Listen with care to what people are saying. If they’re sharing a success or a family celebration, congratulate them. If they’re in a difficult situation, let them know that you’re sending positive thoughts their way.

Be Patient

No amount of asking or reminding will make people join the conversation on your page. It takes time for people to find you, but they will.

Have Fun

This is the most important thing of all.

Growing Your Facebook Page and Increasing Engagement without Contests


If you’re having fun and enjoying your interaction with your Facebook readers, people will sense it and want to join in too. More than any other thing, enjoying the process will help to grow your page.

Beth’s family jokes that she started writing because she just doesn’t know when to be quiet!  In truth, her blogs grew out of a long illness and helped her to keep in touch with the world around her.  Beth believes the world to be a fascinating place, providing us countless gifts and wonderful surprises every single day.  She’s interested in everything, and shares her interests at Aunt B on a Budget, A Word from Aunt B, B on Balance, and B-Attitude.

How to Change the Title Format on Blogger Blogs and Increase Traffic

So you have written great titles for your posts, you have named your images, and you have used key words in your posts. You have done quite a bit to improve your Search Engine Optimization (SEO) and your posts are beginning to move up on the results pages. But  there is one more thing you can do to improve your chances of being chosen from the other posts on the Search Engine Results Page (SERP) and attract more traffic to your blog.

Why Change Your Title Format on Blogger?

You can change your blog’s Title Format, so that your post name comes before your blog name. Why would you do that? Because your post title most probably contains the key words the searcher used, so that puts the words that they are looking for at the beginning of the search result. If you have a long blog name (guilty) the searcher might only see your blog name and a portion of your blog title and that might not be enough to encourage them to click through to my post.

For example:

I wrote a post on How to Make a Substitute for Herbamare. Since I realized that a lot of my readers would not know what herbamare was, I added A Seasoned Salt Recipe to the end of my blog title, thus creating the longest blog title ever.

Search engines send me a lot of traffic from people looking for a homemade herbamare recipe, but they also send me a lot of traffic from people looking for a Seasoned Salt recipe. However, if my blog name came first, searchers would not see most of my post title and my traffic would be greatly reduced no matter how high up I landed in the SERPs.

The Search Engines will only show the first 60 characters of your post title/ blog name. So if my blog name was first,  it would look like this on the SERP:

Premeditated Leftovers | How to Make a Substitute for Herbam…

I might still pick up traffic from people searching on Herbamare, but it would probably be reduced. And I wouldn’t pick up much, if any, traffic from people searching on “How to Make Seasoned Salt”.

With this tip I am going to show you, my post shows up like this in the results:

How to Make a Substitute for Herbamare – A Seasoned Salt Rec…

Which makes it easier to understand why I get quite a bit on traffic for both Herbamare Substitute and How to Make Seasoned Salt.

How to customize Title Format and increase traffic

How to Change Your Title Format in Blogger:

1. Click on Template

2. Click on  Edit HTML.

3. Click Proceed, but if you are nervous after reading the message, you can back up your blog first. 🙂

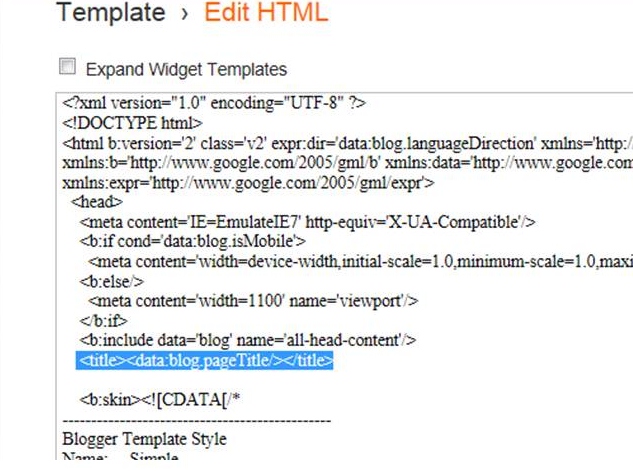
Near the top of your html code you will see (above image):

<title><data:blog.pagetitle/></title> if you don’t find that , you may find: <title><data:blog.title/></title>

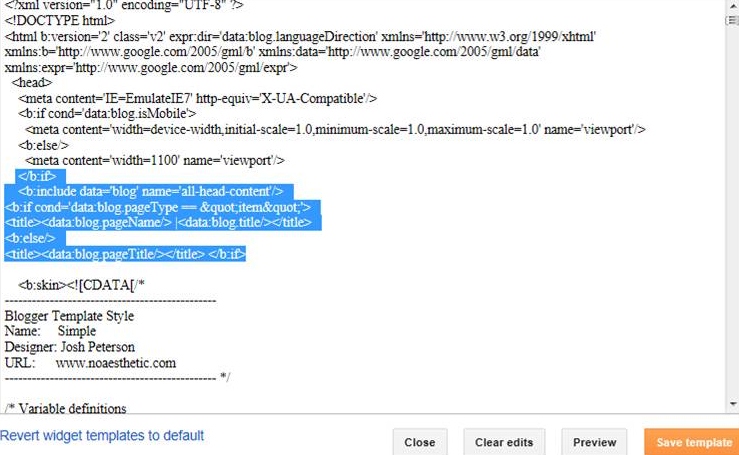
4. Replace the above piece of code with this:

<b:if cond='data:blog.pageType == "item"'>
<title><data:blog.pageName/> |<data:blog.title/></title>
<b:else/>
<title><data:blog.pageTitle/></title> </b:if>

4. Click Save Template. If you get an error message, click clear edits.

Improve appearance on SERPs by changing Title format on Blogger

The change will not take place immediately. The search engines need to crawl your site, before the change will show up on the Result Pages. It will show up immediately when you tweet a post though. I used my old gardening blog to create this tutorial. After completing the process, I tweeted one of the posts (from twitter installed on my dashboard, not buttons below post) and this is what popped up:

Freezing Berries |One Determined Gardener http://www.onedeterminedgardener.com/2010/11/freezing-berries.html

Changing the Title Format allows the Post Title to capture the attention of a larger audience. If I had the blog title/post title format on the above tweet, it would only be noticed by gardeners. With the Post Title first, anyone with excess berries, will take notice.

Now make it easier for those who find your blog to leave a comment and Remove Word Verification!